Looks

3 Editorial Eyeshadow Looks: How to Do Editorial Makeup

Editorial makeup. It doesn’t exactly sound like a look that’s achievable on a day-to-day basis, or particularly easy to pull off. However, the bold, playful finish is flooding our screens as the new, everyday look with a twist. Pushing usual makeup outside of its comfort zone, it’s all about accentuating a feature with bright colours, sharp designs and eye-catching texture. What’s more, with business-professional dress codes down the drain, editorial makeup can be brought from the office to a night out.

So, let’s take a look at what editorial makeup means and how to achieve the look.

editorial eye makeup with illamasqua eyepaints

What does editorial makeup mean?

Typically seen on the fashion show runways, it’s no wonder editorial makeup sounds intimidating to some. However, what editorial makeup means is simply taking the biggest trending looks of the season, as seen on the catwalk, and following suit. Just as we would with the fashion!

With editorial makeup, the skin is mostly kept fresh and natural. The base makeup is an understatement with the attention brought to one feature, usually either the eyes or the lips. Today, we’re going to take a look at some editorial eyeshadow looks.

Blown out eyeshadow

The first editorial makeup look is with blown out eyeshadow.

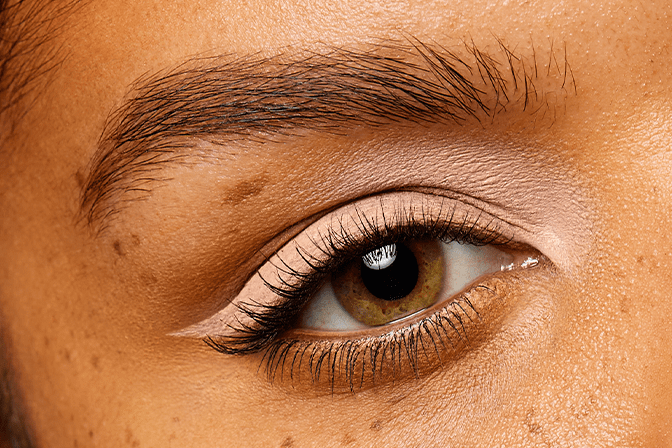
Blown out eyeshadow is where the eyeshadow is diffused past the outer corner of your lid and toward the tail of your brow. Think of it as an enhanced smokey eye. The result is a sultry eye look with a saturated pigment on the lid that spreads across the rest of the eye area. For this look, we’re going to use the Illamasqua Eye Paint Longwear Liquid Shadows with a finish that is eye-catching from a distance and photographs beautifully, perfect for editorial eyeshadow!

blown out eyeshadow

How to do a Blown Out Eyeshadow Look

  • Step One: Using the shade Lapsang Fun, stroke the eyepaint onto the lid of the eye. Focus on applying this editorial eyeshadow close to the lash-line so the lid is most pigmented here.
  • Step Two: Using a Blender Brush, disperse the colour up past the crease and up to the brow bone, covering the entire area of the eyelid.
  • Step Three: Apply the deeper shade, Caffeine Fix, to the outer corner. Blend it into the crease to add dimension to the eyelid amongst the diffused colour.
  • Step Four: Curl the lashes and add a layer of the Illamasqua Infinite Masquara for a dramatic, voluminous finish.

Colourful inner corner eyeshadow

Applying an inner corner eyeshadow is nothing new. In fact, it’s one of the original makeup hacks to brighten the whites of the eyes and make us appear more awake. With editorial makeup, inner corner eyeshadow has a twist- a pop of colour. Plus, to make it extra edgy, you can carry the pigment down to line the lower lashes or finish it off with a colourful wing.

How to do a colourful inner corner eyeshadow

Luckily, how to do this look is blissfully simple. Choose one of the eyepaints with a pop of colour, such as Ginger Mocha, Rose Latte or Matcha Chic.

  • Step One: Draw a line from the inner corner to where the bottom lash begins and a line that starts 3/4 along the lash line to the outer corner.
  • Step Two: Using a Brow Definer Brush, define the inner corner line and spread the outer liner out to create the flick of a wing.
  • Step Three: Again, finish with a layer of the Illamasqua Infinite Masquara for an editorial finish.

Graphic eyeshadow

Graphic eyeshadow is all about definition. For this look, we’re creating a cat eye-flick, but holding the eyeliner. As the eyeshadow paints are incredibly pigmented and transfer-proof, with the right technique, they work perfectly as a graphic eyeshadow.

graphic eyeshadow

How to do a graphic eyeshadow

  • Step One: Using the shade Darjeeling Ink, roughly trace the line of your upper lash from the inner to the outer corner using the eyepaint.
  • Step Two: Using the blending brush, gently blend the eyepaint at the inner corner so that the pigment is diffused at the inner half of the eyelid.
  • Step Three: At the outer half, use the Brow Definer Brush to define the line and create a sharp wing in the outer corner.
  • Step Four: Along with the top lashes, don’t forget to coat the bottom with mascara too. Swipe the wand from side to side to gently coat the lashes, then come in with the tip of the wand to add emphasis to the individual lashes.

As you can see, editorial makeup certainly isn’t as complex as it sounds. Take your every-day look to the next level and add a bit of dimension, a pop of inner corner colour, or an eye-catching graphic. With the right tools and techniques, you can bring the catwalk with you wherever you go.

Shop This Post:


Josie Wilkins

Josie Wilkins

Writer and expert

Josie is an online content creator with a degree in journalism. In her free time, she's jade-rolling or buying over-priced candles. When she's not doing either of those, she's digging deep to find the latest makeup essentials.