Drag has a rich cultural history. Spanning from cross-dressing performances to challenging fixed roles of gender and sexuality. There’s no doubt of the high impact that drag makeup has had on mainstream culture and makeup - especially over the last decade.
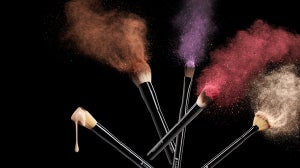
Drag makeup is a complex art form that takes creativity, skill and patience, but most importantly the ability to step outside of the box and be fierce.
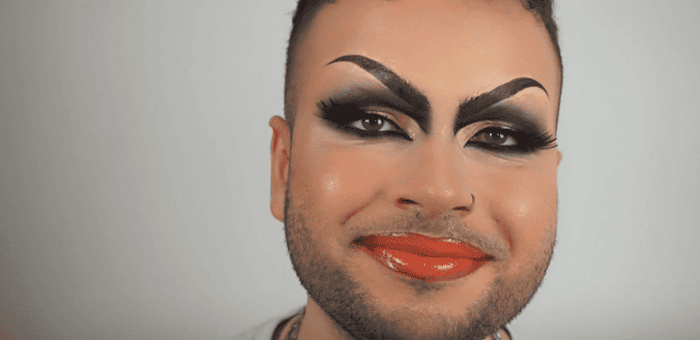
In this drag makeup tutorial, our Colour Cosmetics Retail Artist and Glow Up Season 2 contestant, Berny Ferr, explains and breaks down how to create an iconic drag queen makeup look using a range of Illamasqua products. While it may not be your go-to, every-day full face, this fierce look will serve an attitude.
https://youtu.be/ZfE1qqD4zGg
Perfect for whether it’s your first time in drag or you’re wanting to try out an entirely new makeup style, this step-by-step drag makeup look is worth a try.
STEP ONE: GLUE, EYEBROWS AND POWDER
Arguably, the most iconic feature of a drag queen's look is their overly-drawn eyebrows and exaggerated features, so any trace of the natural eyebrow has got to go.
Start gluing down your eyebrows by adding a layer of glue stick, coating in the direction of the root. Then using our Spoolie Brush, comb through the brow hairs in an upward motion. Wipe away any excess glue to clean the edges and allow time to dry. Repeat this step three times to ensure the brow area is smooth and fully covered.
Once the final layer of glue is set, using our Loose Powder, set the brows. Take our domed shaped Blusher Brush, pinch the top and apply powder in fast dabbing motions. Ensure brows are fully covered and then sweep product away once set.
Take our Skin Base Foundation and using the same Blusher Brush tap the product into the skin. Set again with powder and repeat 2-3 times to make sure your brows are entirely covered.
STEP TWO: EYESHADOW
The bolder, the better. With your eyebrows now covered you have more room to apply your eyeshadow. A key tip for drag queen makeup is to exaggerate the shape of your eyes. With our Movement Artistry Palette, take the shade Expressive and place it along the line where your natural brows sit. Mapping out your new eye shape and using tapping motions, build across and connect both the inner corner and outer corners of your eyes to create a dramatic shape. Then using Truth as a transition shade, feather out and further defuse the dominant green shade with our Blending Brush.
Then using our Skin Base Lift Concealer apply with a Concealer Brush. Use a stamping down motion rather than a swipeto ensure precise shape and cut the crease.
To darken the crease, use our Elemental Artistry Palette in shade Elphaba. Take our Smudge Brush and blend the black colour with the green in tapping motions to give the eye more dimension. Using the Concealer Brush again, pat on the corners where the black is and blend it out further.
Now for the best part, shimmer. An essential to any drag makeup kit, adding shimmer to the eyes is what will take this look from basic to fierce. Using the Beyond Artistry Palette and our Large Eyeshadow Brush, pack the shade Dynasty onto the centre of the crease. Using patting motions, blend into the black shade and move across the lid.
Time to add glitter: use our Pure Pigments with our Small Eyeshadow Brush and tap the product onto the inner corner. Using Pure Pigment in Beguile in the centre of the crease, then apply Fervent to pop on the outer corner.
Add our Precision Gel Liner as close to the lash line as possible in the form of a wing to frame the eye. You can also draw a line across the natural brow to add definition. Use our Colouring Eye Pencil in Sophie to line the waterline down to the lash line itself, blending out to the green and black shades with our Smudge Brush.
STEP THREE: EYEBROWS
A trick for the eyebrows is actually to use eyeshadow. Using the shade Eponine from our Elemental Artistry Palette and the Brow Shaper Brushmap out your brow shape. Following the shape you have created, draw, fill and define the eyebrow to flow with your eyeshadow.A key tip is to ensure the curve of the eyebrow stays thin and defined. Once drawn, cut the brow using concealer to make the eyebrow look nice and sharp. Repeat this on the other eye.
STEP FOUR: SKIN
Prep the skin using Hydra Veil Primer. Use our Skin Base Foundation and mix it with a little bit of our Beyond Liquid Highlighter to add a glow to the skin. Using our Foundation Brush, apply to skin.
Tip: use a Small Blender Brush under the eyes to get rid of any small brush marks and smooth out the area.
Then using our Blender Brush apply concealer under the eyes and pat into the skin to blend and brighten the under-eye area.
For contour, apply our Gel Sculpt from the stick and map out above the cheekbone, repeating on the other side, then blend with the angled Contouring Brush. Add a second layer, this time going up to the temple and across the forehead, and blend.
Next is the nose, draw a line down both sides and then across the bottom on the nose. Using our Loose Powder on a Blusher Brush, apply to either side of the nose and leave to ‘bake’ until the look is complete.
Applying on your cheekbones and up to your temples, use our Colour Veil in Tonic and blend in with the tip of your finger.
Tip: Add some blush under your brow bone to add a whisper of contour.
Apply Beyond Liquid Highlighter to the tops of your cheeks and temples, then down to the tip of your nose once the Loose Powder has been brushed away.
STEP FIVE: LIPS
Use our Lip Brush to line the lips by dipping into our Antimatter Lipstick in Fahrenheit. This ensures the lips are symmetrical, then fill in the lips using the lipstick straight from the bullet.
Create a deeper edge using our Lip Pencil in shade Revealed. Once you’ve lined the lips again with the Lip Pencil take our Blender Brush and blend the outer darker corners of your lips. To finish the lips, layer with Beyond Lip Polishin Charm to give a fierce finish with a warm undertone.
STEP SIX: FINAL TOUCHES
To bring the entire look together, add our Visage False Lashes and coat with Masquara Raven to blend together your false and natural lashes.
Using our Blusher Brush, swipe away the excess powder on your nose to reveal a perfect contour.
To finish, add a spritz of Hydra Setting Spray to set the look in place.